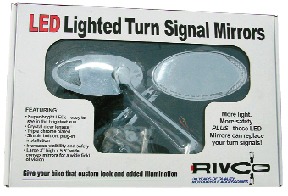
LED-Lighted Turn Signal Mirrors
Rivco
MSRP $249.95
www.rivcoproducts.com
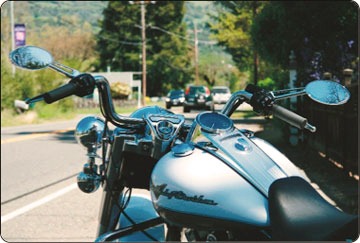
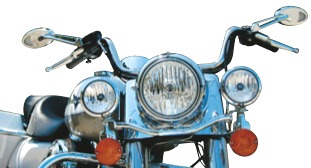
From a safety standpoint, the advantages of having auxiliary turn signals/running lights mounted out at the ends of the handlebar are self-evident. Projecting a more prominent visual presence and more emphatic indication of your turning intentions have to qualify as two of the most effective means of enhancing operator safety under all riding scenarios. That’s the immediate functional benefit of the Rivco LED Lighted Turn Signal Mirrors, but not the only one. The other functional advantage, at least in the application we put them to—installing them on a 2009 Road King—is that the LED indicators on the operator-facing side of the mirrors provide a more visually convenient way to assure your flashers are on—or off—than diverting your gaze down at the idiot light strip beneath the speedo on the tank dash.
So far, then, the Rivco mirrors are a win-win proposition and that’s even before we consider their cosmetic merits. Sturdy billet sculptures, flawlessly executed and plated, these mirrors are dramatically more attractive than the stock units they replace even while furnishing a comparable field of rearward view. They have a high-custom appearance, but not one that’s so edgy and extreme as to look out of place on the stock Road King.
The only drawback the product presented in our installation project was the vagueness of the provided instruction sheet. That’s to be expected somewhat, since the mirrors are suitable for use on a vast array of models, both American and metric, all with their own nominally distinct mounting and electrical considerations. As applied to the Road King in question, the directions basically directed us to bolt them on and wire them into the harness. Oh.
Still, after suitable study of the task at hand, and with a decent collection of wiring bits and pieces—to say nothing of a handy familiarity with basic Road King headlamp disassembly procedures—the installation came off without much fuss, and with a good deal of satisfaction when the things worked as promised.
The first step is to remove the stock mirrors—a simple procedure using a 9/16″ wrench. Step two is to install the Rivco mirrors in their place using the provided Allen bolts, which should be just as simple, but in our case required the additional step of chasing the threads on the Rivco mirrors with a 17/64″ tap to remove the debris left by the polishing and chrome plating process in order to bolt them on.
The next order of business is routing the thin three-wire bundle from the Rivco mirrors around the switch modules on either handgrip and into the plastic retainer rings running the length of each side of the handlebar to the headlamp shell, sliding them through the rings alongside the stock wires.
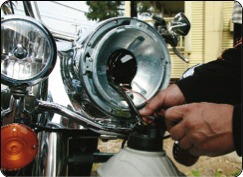
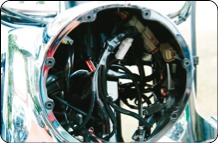
Once that routing is complete, the rest of the installation operation takes place inside the headlamp shell, and to adequately access that space requires the removal of the headlight trim ring, headlight, retaining ring and mounting/adjustor ring. The only tool required is a small Phillips screwdriver. A single screw secures the trim ring, and once the ring is removed you have access to the three screws of the retaining ring. Remove those screws and the headlight comes free and can be set on a shop rag on the front fender without unplugging it from the wiring harness. Eight screws secure the mounting/adjustor plate, each threaded into a sleeved rubber grommet. Carefully remove the screws (being careful not to inadvertently extract the grommets from their mounting holes) and you’re in.
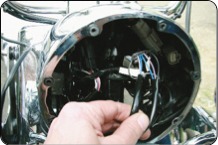
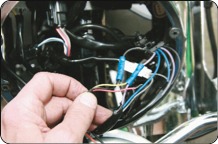
Now route the mirror wires alongside the stock wires through the back of the headlamp shell and out through the front opening. At this point you can easily trace the stock turn signal/running light wiring to the shell connector block on the upper right side of the recess. To facilitate the splicing of the mirror wires with the stock wires, the shell connector can be detached from its mount by gently working out the flanged plastic push-in prong that fastens it there.
With all the pieces of the puzzle now in plain view and within easy reach, the next step is to determine which of the wires from the stock lights are for the turn signal function, and which are for the running lights. Consult the wiring diagram in your shop manual, if you have one, or if you don’t have that resource (like we didn’t) a quick probe with a multimeter into the shell connector with the ignition on and one of the turn signals activated will tell the tale. In the case of the 2009 Road King, the pink/red wires are the turn signals, the blue are the running lights, and the black, naturally, the grounds.
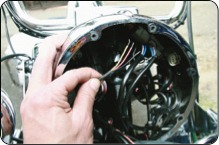
Cut all six stock wires at a point about two inches back from the shell connector and strip a half inch of insulation from all exposed ends and let the splicing begin (unplugging the shell connector simplifies the procedure). Twist the stripped ends of the Rivco mirrors’ red leads together with the stock running light wires (in our case, the blue ones), the yellow leads with the turn signal wires (pink) and the black grounds with the black grounds. Insert the pairs into the ends of six solderless splice connectors and crimp securely. Insert the ends of the corresponding wires from the shell connector into the other end of the splice connectors and crimp those as well. Plug the shell connector back in and test your work. With the ignition on, the forward-facing LED arrays on each mirror should illuminate. Activate each turn signal to assure you didn’t get the wires reversed. (You don’t want the right mirror flashing when you’re turning left, you know?)
If it’s all good, button the internals back up, reinserting the shell connector into its mounting hole, and wrapping the bundle of splice connectors with electrical tape. Reassembly of the headlamp shell is the reverse of the disassembly procedure, again with this caveat: be careful when threading those eight screws on the mounting/ adjustor ring into the rubber grommets. If one gets pushed out of its hole, you basically have to start over, and you also have to locate the displaced grommet. (Trust me. We goofed and ended up having to use a flashlight to locate a dislodged grommet where it had lodged in a dark cranny of the headlamp shell. And this after having scoured the ground and the entire front end of the bike looking for the slippery little bugger.)
With everything reassembled, the appreciation of the Rivco LED-lighted mirrors can begin in earnest, and there’s a lot to appreciate. The outward LED arrays glow as running lights and become sequential indicators when the turn signal is activated. The inward, operator-facing LEDs only light as turn signals, and do so brightly enough to be easily seen even in direct sunlight. Besides looking really cool, the mirrors give you seriously enhanced visibility on the road and the peace of mind that goes with it. Altogether, the installation takes about an hour, working methodically. (That doesn’t include the 20 minutes we spent tearing our hair and searching for that evil little grommet.)