I’ve spent a majority of my motorcycling life with a sore throat. No, not from toking on coffin nails or carelessness while siphoning gasoline—from yelling at inattentive drivers whose only apparent purpose is to cause my early demise. And yes, I’ve had horns on most of my bikes, but most were anemic and gave rise to a most famous slogan, “Loud Pipes Save Lives.”
And while air horns are definitely the only way to go, the multitude of problems with that particular design includes finding a suitable location for the compressor, routing air lines and wires and the placement of the actual horns themselves—all while trying to maintain clean looks. That almost-impossible task has been wrestled into do-it-yourself obedience with the Mini-Beast2 by Pro Pad.
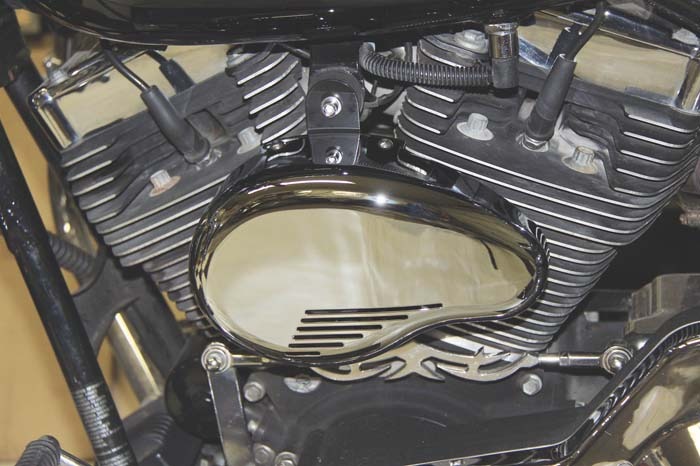
The Mini-Beast2 is completely self-contained, managing to house twin trumpets behind an 18-gauge stamped steel cover and mounting in place of the OEM Harley horn. The cover is available in several styles. I chose the MB-2 that matches the look of an S&S air cleaner cover. Other covers resemble stock Twin Cam air covers or a custom finned unit. Each cover comes in a chrome, gloss black or wrinkle black finish.
Installation is a snap with two spade terminals connecting to the stock horn switch wiring and a third hot wire that runs to the positive side of the battery. After removing your original horn, also exchange the stock rubber mounting grommet with the one supplied with the Mini-Beast. This new unit utilizes a modified design to help aid in supporting the additional weight of the air horn (the Mini-Beast comes in at just under two pounds) and replaces your stock mounting nut with a chrome hex key through bolt. Due to the significant increase in dangling weight over the stock unit, a dab of blue thread-lock liquid is highly recommended. Hang the horn in place and bolt it down, paying attention to alignment. Plug in the negative and positive wires to the bike’s connectors according to the instructions and tie-wrap them out of sight. Then attach the hot wire.
The hot wire comes equipped with a fused connection that is replaceable. Routing of this fused wire to the battery is simple and does not require removal of the gas tank. Using the included zip ties, the wiring is almost invisible once installed along the frame and under the tank. Bolt the ring terminal to the hot side of the battery, leaving access to the fuse by locating the connection in the pocket in front of your battery. Replace your seat and you are ready to rock and make some noise.
Delivering an ear-busting 128 decibels, the Mini-Beast2 is not something you want to test inside a closed garage, but out on the open road. Once there, it delivers all the attention that no amount of death screams could ever provide. The Mini-Beast comes complete with installation instructions, and a chrome bracket instead of the gloss black model is available for an additional $15. The Mini-Beast even comes with a three-year replacement warranty—a guarantee of more than 1,000 days of loud-as-hell defense.
$189.95 (as tested with black bracket)
www.thepropad.com
800.403.2714