


Last month we delved into the basic “ABCs” of clutch cables for 1996 and later Harleys (among other things) and this month we aim to finish the job. Well, sorta. Actually what’s gonna happen is we’ll talk about brake lines… along the same line. In other words, try to make sense of senseless confusion about these basic essentials… make sense?
OK, here we go…
A line (or so) on brake lines
Hydraulic brake lines are part and parcel of a handlebar swap, yet even though as common as a cable change, a lot easier to get wrong. It could be as simple as using the wrong brake fluid—everything in the time period we’re talking about used DOT 5 (silicone) fluid—until 2004. Touring bikes switched to DOT 4 in 2005—2006 for all other Big Twins—and 2007-on Sportsters. Then there’s the banjo boondoggle!
Stock calipers (until the advent of 70-degree Brembo applications) use banjos with 10mm/3/8″ holes and 90-degree elbows. Most single front disc machines use 12mm/7/16″ banjos at the master cylinder—with elbow angles that range from non-existent (so-called 180-degree, or ironically, 0-degree, “straight” ones) to a slight (35-degree) kink used pretty much on all Touring bikes, to a rare 60-degree bend or even a full right angle (90-degree) type used on low-bar bikes. This is damn near entirely about setting up the “run” of the hose portion of the brake line and establishing a kink-free line from master to caliper. These angles, runs and lines are also entirely up to you when it comes to a bar swap. Since braided lines appeared years back, arguably the biggest changes have been to universally add clear protective coating to them so they don’t sandpaper everything they touch… then color them. Now, you can get traditional stainless steel, a chrome look or even black braided… with more options undoubtedly to come in future.
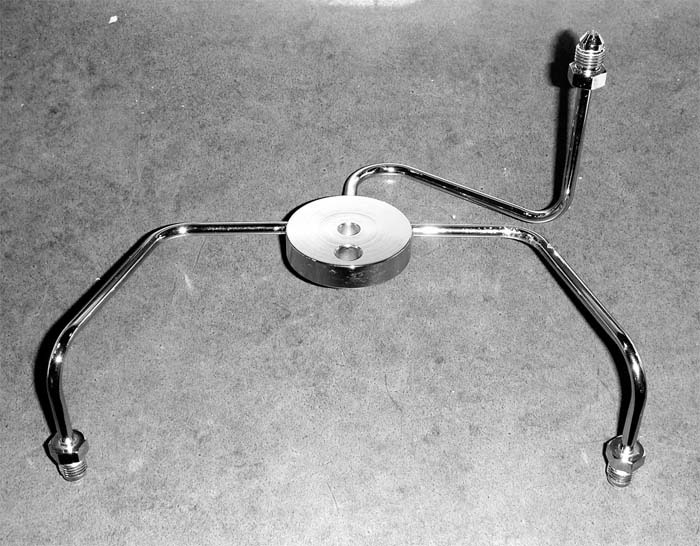
Unlike stock stuff, aftermarket brake lines for dual front disc bikes (including H-D’s own variations) rely on some form of the gadget you see here. The lower lines screw on and drop. The handlebar line screws on and rises… simple enough… until the advent of ABS with its so-called “middle line” and a mysterious box that lines enter and exit. Handlebar/brake line swaps for ABS bikes need to be carefully planned and budgeted for, to be entirely successful. Consider yourself advised!
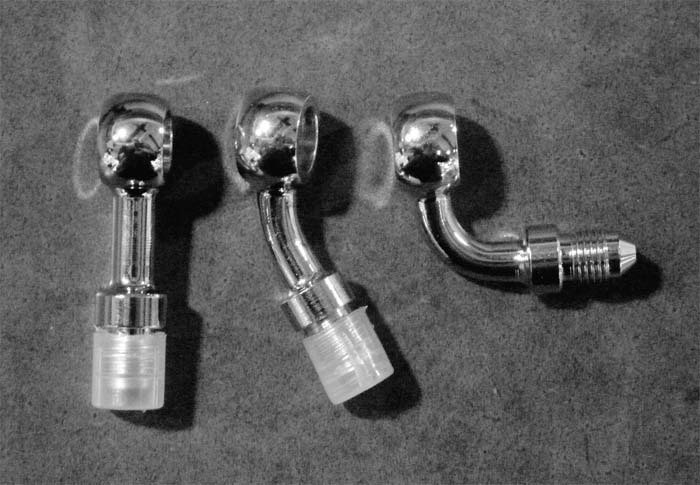
Brake lines play the elbow game as well, as this picture shows. Straight (180/0-degree), 35-degree and 90-degree versions, for much the same purpose. For the handle bar end of things there are two sizes; 10mm/3/8″ or 12mm/7/16″. For the brake caliper end, mostly 90-degree (some 70-degree on late ABS-era bikes) with the 10mm hole.
Once the banjo sizes, elbow angles and look have been determined—it’s down to getting the length right… right? Single disc stuff is simple. Again… best measured against the actual handlebar … after it’s installed and before you buy hoses. If not done this way—well—a little too long only looks untidy, a little too short is a disaster… sooner or later.
Double-disc bikes are more complicated, not just because of the bars and their height, width or lack of either, but because of extended (or lowered) front ends. Then there’s the fact (which comes as a surprise to many owners) that all standard OEM brake lines are one-piece metal pipe and rubber (with precious few exceptions), whereas all replacements (even Harley’s own) are multi-piece, and rubber is almost extinct. All this boils down to “building” a brake line assembly from braided components. This usually takes the form of lower line kits mated with the appropriate, matching upper line, or getting the lower hoses, upper hoses and fittings separately and building what’s needed from scratch. Not as intimidating as it might sound, and in many cases particularly attractive where both the forks and the bars are no longer stock. I’ll repeat once more: The best way to go about this is to measure from fact—a reality check—but most will simply revert to the “plus” (or “minus”) method and wind up within a couple of inches of correct.
NOTES:
*Threaded throttle cables are 5⁄16″-18tpi and idle cables are 1/4″-20tpi
**… means stock butterfly carbs! Edelbrock carbs are different than any others. Most S&S carbs will work with either early or late cable free-lengths by means of a simple swap of the throttle cable holder—(S&S #11-2339) for butterfly 3.75″ free-lengths or (S&S #11-2338) for CV 5″ free-lengths. Mikuni carbs are a little tricky—being neither butterfly, nor CV—but slide-type carbs, and early HS40s use unique cables with a limited choice of lengths… like Edelbrock. Later HSR carbs use the same cable types as the factory CV carb—for your respective model and year.
Brake hoses and lines got a severe upgrade in complexity with the addition of optional ABS on Touring bikes in 2005 (and Softails this year). Should you choose to do any serious lowering or handlebar swapping on these bikes, be aware you’re also liable to need as much money for proper brake lines as for the bars, or the lowering kit… or possibly both! In short, it won’t be cheap or simple to do a complete braided changeover on ABS-equipped models. To give one example for 16″ apes for the 2010 ABS Road King:
Aftermarket lower line kit = $165
Aftermarket middle line kit = $75
Aftermarket upper line kit = $58
Total of $298
Add the price of the bars and the clutch cable and the extended switch wiring and the throttle-by-wire extension—forget labor—you could be into this project for 700-800 bucks—no trouble. And genuine Harley lines are even pricier, but include the so-called “middle” line! However, I’m of the opinion that not enough thought is given to the lower lines. Seems to me, if a bike with ABS is lowered and proper shorter lines are not employed, it would to some degree potentially affect braking performance—partly because a typical lowering effort also increases the suspension stiffness and reduces the effectiveness of damping in forks with reduced travel. ABS works from tire traction (or lack thereof) and the result of major alterations, I would think, could easily change the rate and degree to which the ABS is invoked… potentially causing a “stuttering” effect which would increase stopping distances relative to the stock configuration. Also—there exists a possibility that the lines would “whip” and/or nearly kink, with forks at full compression… affecting things in minute but degrading ways as well.
NOTES:
*Idle cables with cruise control capability have 4 7/8″ free-length—and of course—a switch.
There’s nearly a half-inch of useable adjustment in most throttle or idle cables.
For all intents and purposes, the elbow angle is what it is, to suit the handlebars and/or cowling involved—meaning—a 90-degree elbow will be most applicable to most low (flat track, beach or drag-style) bars, while high, wide and handsome (say, apes under 14″, and “Glides” with fairings) could/would/ should use the 70/130 elbow. Seriously high and narrow stuff, or any situation where the ‘run’ of the cable would otherwise be bowstring tight or just plain ugly, should consider the 45-degree elbow.
Lengths are those available from Harley, normally in 2″ increments, but custom lengths are not just readily available but done to anyone’s wildest dreams… for better or worse.
For those who prefer to leave all these decisions and speculations alone, and are satisfied with the factory selections of alternative handlebars and associated cables and lines—there is good news! A little light reading of the GMA catalog for 2011 will reveal that not only does The Motor Company offer more options than ever, but will inform you as to exactly which cables, brakes lines and other items to use for a “perfect” and painless conversion! As for the rest of us Bohemians who still fancy DIY crazy stuff—I hope this information has at least been able to make the process a wee bit more rational.


")


