Glide your ride
2009–2018 H-D Touring Series Ultimate Ride Kit w/Rebound Adjustment #MC-2904, $1,599
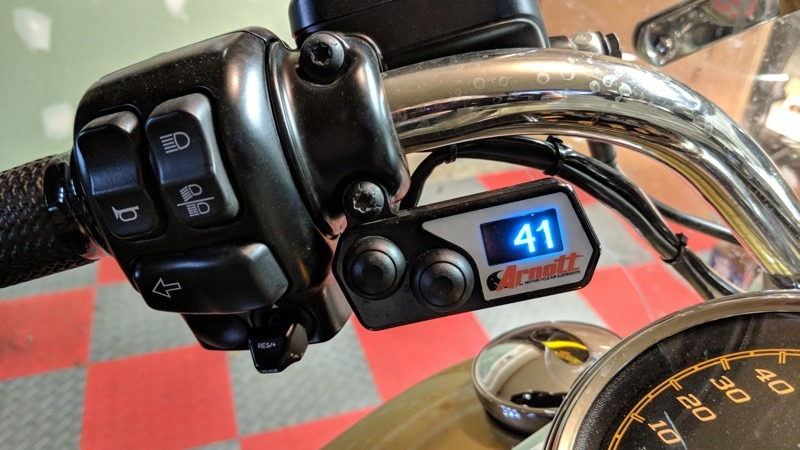
Motorcycle Handlebar Switch Pressure Gauge #K-3114, $299
Arnott Motorcycle Air Suspension
arnottcycles.com
In 2007, Harley-Davidson introduced the 96” Twin Cam and six-speed transmission, resulting in a redesign of the primary case. Due to the widening of the primary, the Touring model line was now out of reach—literally—for me as well as other riders of short stature. Finally, 10 years later, H-D once again redesigned the primary, slimming down the case so that I could sit on the bike with both feet touching the ground—at the same time, no less! So shortly after a demo ride on a Milwaukee-Eight Tourer, I rode a brand-new 2017 Road King out of the dealership showroom.
The Road King is the heaviest bike I’ve owned, and I wasn’t completely confident maneuvering it at slow speeds—especially when I had to move it back on a slight incline. And once I even dropped the bike because my foot went into a slight depression in the ground. Harley-Davidson does not offer lowered front or rear suspension for that model, so I began a search to lower my seating position.
Although a few aftermarket companies offered shorter replacement shocks, I wasn’t sure that I wanted to drop the rear suspension more than an inch or so as I didn’t want to adversely affect the handling. And I knew that an inch wouldn’t have given me the leverage I needed to move that 826-pound beast wherever I needed it to go. Additionally, the new stock suspension for the M-8 models was far superior to anything Harley had developed in the past, and I didn’t want to lose those improvements in comfort and handling.
I started researching suspension systems, and found that Arnott Motorcycle Air Suspension not only offered air suspension with rebound adjustment, but they would be set up at Daytona International Speedway during Bike Week! When I called to ask a few questions, and set up an install appointment for the 2009–2018 H-D Touring Series Ultimate Ride Kit w/Rebound Adjustment (the kit comes in both black and chrome), Doug Taylor, Arnott’s marketing manager, suggested that instead I ride an hour south to their headquarters in Merritt Island to have the install performed there. He promised me a tour of the manufacturing facility, which sounded intriguing, so I was all in!

Arnott Air Suspension started out in automotive, about 25 years ago. When owner Adam Arnott was a teenager, he helped fix the air springs in his dad’s Mercury. Donald, Adam’s dad, saw that Adam was able to save his dad money and figured he could save other people money as well. So they created a small company in Ft. Myers, moved to Orlando, started expanding to include additional American as well as European vehicles, and eventually moved to the 300,000-square-foot facility on Merritt Island (on Florida’s Space Coast) where the company is located today.
A decade ago, Arnott branched out to manufacture air suspension for motorcycles (after all, Donald was an avid motorcyclist), which proved to be wildly popular. Not long ago the company hired Matt Kirar, who was a resident engineer at the Harley-Davidson product development center in Wauwatosa, Wisconsin. Matt has been a motocross racer for years, and he couldn’t afford to pay for to anyone work on his bikes so he had to work on them himself. His mechanical skills helped him develop various suspension platforms for new Harley-Davidsons, and he now performs this function as the Mechanical Engineering Manager for Arnott.

One big leap that Matt enabled Arnott to make was to bring in Fox suspension technology to create new products. Arnott came out with two new kinds of motorcycle shocks—the Smooth Series which is the less expensive model and the Ultimate Ride Series based on the Fox shocks. A simplified explanation of the company’s patent-pending TruAIR Technology is that a custom-valved Fox-based shock with a multi-ply Goodyear air bladder creates true air suspension, rather than just air-assisted shocks or simple air cylinders. The tops and bottoms of the shocks are manufactured in Arnott’s machine shop, and all the pieces are put together to create a system to offer better control and comfort, as well as quicker and easier height adjustability.
According to Matt, what differentiates Arnott Air Suspension from the rest of the market is that the Arnott system is a true air spring. Most of the original equipment shocks use the older twin-tube design, which doesn’t generate damping force as quickly or efficiently. And the OE shocks can only be inflated to around 50 psi without blowing a seal, while Arnott’s shocks can be inflated up to at least 100 psi. Also, with many of these shocks, there’s nothing to separate the nitrogen gas from the oil so the result could be foaming of the oil which can cause various problems, whereas Arnott uses an internal floating piston (IFP) to separate the oil and gas to keep the oil from foaming. And several aftermarket air suspension companies take cast off 1980s Corvette shocks, which are basically air cylinders that only go up and down, and retrofit them for motorcycles. Arnott’s website provides extensive information on each element, as well as all the advantages, of their air suspension systems.

The tour of the facility was quite impressive; manufacturing and quality assurance processes are held to the highest standards. And I was fortunate to have Matt install the Ultimate Ride Kit on my Road King, although Arnott’s instructions are detailed enough, complemented by photos and color-coded routing and electrical diagrams, and online installation videos, so that mechanically-skilled motorcycle owners can do the install themselves. Granted, it will take several hours for the first one, but the kit is bolt-on and designed so that it can be a DIY job.
The installation instructions contain a list of all the parts that come in the kit, so as with any other project, it’s recommended that you make sure all parts and tools you need for the job are on hand. There’s a specific method to removing your bike’s current shocks, so follow it carefully! Saddlebags and seat need to be removed, and other accessories may have to be removed or their supports loosened as well.
Grossly simplified, the air pump goes on first, then hosing and wiring is added and attached, the shocks themselves installed, and finally the handlebar switch affixed. Routing the hoses and wires properly is critical; otherwise, they might be crimped, compressed, cut, or get too hot because they’re too near the exhaust or other bike components that heat up.

My first ride after the install was better than I’d hoped for. Matt had set the rebound damping for my weight and riding style, and it was quick and easy for me to adjust my riding height on the fly, even while I was on the road. Once I dialed in the optimal air pressure, the ride was quite comfortable, and the handling was superb, even while hitting random bumps in the road. When I pulled into a parking lot and came to a stop, I pressed the deflation button on the handlebar switch and the bike immediately dropped about three inches, making it quite easy for me to back the bike into a parking spot. After I got back on the bike, I pressed the inflation button and rode away. Just that simple.
The next time I rode the bike, the first bit of rough road I hit reminded me that I’d forgotten to raise the suspension. However, due to the engineering of the suspension, the shocks will never drop down lower than the stock shocks’ capability, nor will they cause the tires to rub against the fender. And the Arnott system will never go higher than the stock shocks, preventing extra stress on the bike’s drivetrain.
As happy as I was with the Arnott system, I wanted to know how much air pressure was in the system before hitting a bump in the road. By the time I went to Sturgis this past year, the company had released their Motorcycle Handlebar Switch Pressure Gauge, so I arranged for my basic handlebar switch to be replaced with the new product.

Once again, the installation manual was very detailed, listing all the parts in the box as well as providing instructions with photos. The install isn’t complicated, but it can be somewhat time-consuming, with the removal of the saddlebags and seat, tracing and running wires, and connecting the gauge system to the air bladder and the ignition system before affixing the gauge to the handlebar.
Now as soon as I start the bike I can see at what level the suspension system is set; the display on the gauge is easy to read both day and night. The installation manual gives instructions for finessing the controls for optimal settings. This has made a big difference in the consistency and smoothness of my ride. I couldn’t be happier with the results, and my confidence level in handling a bike as heavy as the Road King has increased dramatically.
The only suggested maintenance for the Ultimate Ride Kit is to clean off any dirt or debris around the distribution valve to keep the plunger working properly. Technical support for fitment or installation questions is available by phone, and Arnott is so sure of their products’ integrity and durability that air suspension systems sold in North America or the European Union have a limited lifetime warranty.


please send me infro are where I can buy your system and cost for a 2013 ultra limited. do you have to take fairing off to run switch to handle bars