
JIMS
P/N 5400 Polished Cylinder Head Fan Kit—$500.45
P/N 5401 Black Cylinder Head Fan Kit—$437
P/N 5402 Silver Cylinder Head Fan Kit—$437
P/N 5462 Chrome Cylinder Head Fan Kit- $529.60
P/N 5447 JIMS Engine Hardware Mounting Kit—$36.35
P/N 5457 ForceFlow CVO Stud Kit—$40.30
jimsusa.com
As cubic inches increase and EPA requirements become more stringent, the amount of heat produced by the Harley-Davidson Twin Cam engine has grown exponentially. The summer after I acquired by 2012 FLD Switchback, I realized that the heat generated at the cylinder heads when I was stopped in traffic, or when I slowed down to park the bike after I’d been riding a while, was nearly unbearable. It was at a trade show that I first saw the JIMS ForceFlow Cylinder Head Cooler, and it seemed like it could be the perfect solution.
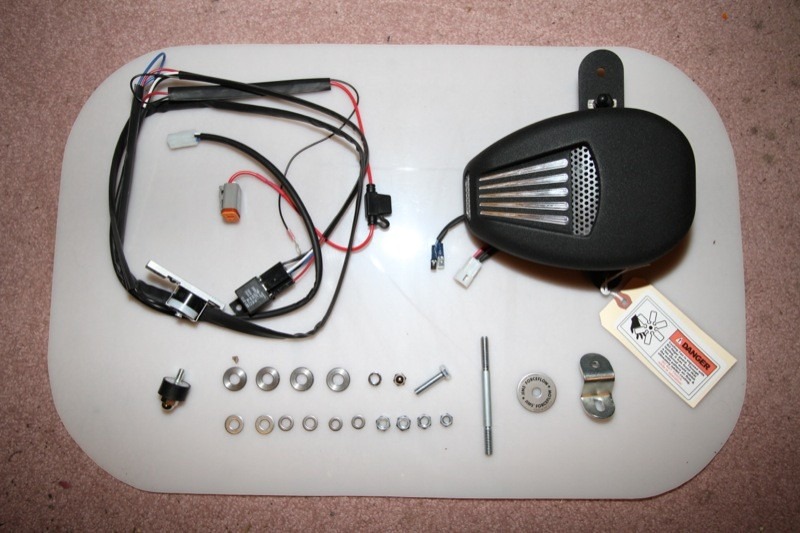
The ForceFlow Cylinder Head Cooler is designed to install in place of the “cowbell” horn housing for 2009-present Twin Cam Touring models (and other models, with some fabrication). The device pushes air through the cylinder fins at a high velocity and directs it at the head gaskets. The cooling fan was designed to cool brakes in Nascar races, and it is purported to lower head temperatures up to 100 degrees.
I ordered the #5401 Black Cylinder Head Fan Kit for my FLD. Inside the package was the cooler and all hardware necessary for a stock Twin Cam engine (mine is 103”). For those with a CVO 110” or 120R engine, the #5457 ForceFlow CVO Stud Kit is required, and for JIMS engines, you will need the #5447 JIMS Engine Hardware Mounting Kit. I’d asked Ken Puzio of Black Hills Custom Parts in Rockaway, New Jersey, to perform the install.

Inside the box was also a detailed and thorough instruction sheet. (Note that what follows here is only a summary.) First, Ken removed the seat, disconnected the negative battery cable and raised the gas tank for easy access (you may need to remove your gas tank completely). Then, off came the existing horn assembly and bracket. The instructions called for using a box cutter or knife to cut a notch out of the left plastic harness trough, but, as also noted on the instructions, Dynas and Softails don’t have this type of wiring setup. Then were directions on properly routing the cooler’s and bike’s main wiring harness to keep all the wiring off the cylinders. We also had to disconnect the front of the shifter linkage rod which was in the way of the cooler’s thermostat (you may not have to do this for your bike model or engine type).
We were directed to remove the rear screw from the front rocker box to mount the thermostat assembly, however, on my FLD there wasn’t enough clearance. Instead Ken removed the center screw of the front rocker box and mounted the thermostat assembly using the new JIMS-provided bolt.

Next Ken removed the top center case bolt from the engine case, replaced the bolt with the JIMS-supplied one and then fastened the lower bracket of the cooler assembly. For my FLD, he had to drill the bottom hole of the lower mount bracket for a proper fit. He re-fastened the shifter rod assembly to make sure there was enough clearance (JIMS provided a replacement acorn nut if needed for more clearance). Then he installed the JIMS rubber isolator to the lower support bracket.
Connecting the wiring from the ForceFlow housing to the harness was next, followed by hooking up the horn connectors. Ken fitted the ForceFlow assembly backing plate upper and lower tabs and noticed that the holes didn’t line up, even with the lower isolator set as high as it could go, so he drilled the top hole of the ForceFlow backing plate for proper alignment. (This step isn’t necessary for Tourers.) JIMS also provides washers for proper horn mount spacing.
Ken finished the wiring and positioned the wiring properly so it was up and out of the way, making sure it didn’t touch the fan blades, and took up the slack in the wiring. Then he completed the install of the ForceFlow assembly. Next was connecting the Deutsch connector housing to the Data Link Deutsch Connector in the FLD’s fuse box. However, the JIMS connector was four holes and the connector in the fuse box has six pins, so Ken cut off the four-hole connector and soldered a six-pin on to match. The instructions suggest other connection methods for Dynas as well.

Once the installation was complete, Ken lowered the fuel tank into its proper position, placed the seat back on and connected the negative battery cable. The ForceFlow has a switch that can be set to manual or automatic, with the latter turning on the fan when the front rocker box reaches 140 degrees. We started the motor and let it heat up while Ken held a Raytek infrared temperature meter at the front rocker box. It worked! The ForceFlow started up when the temperature reached 140! I’ve been riding my FLD for quite some time since then, and the difference is quite noticeable; the cylinder heads don’t get nearly as hot as they did before the installation. I would highly recommend the ForceFlow Cylinder Head Cooler to anyone with a Twin Cam.


Sounds like a lot of drilling/fabricating for $500. To me, if it’s going to cost that much, it not only better work but I’d surely expect it to fit perfectly and look good too!
Just sayin’
Excellent post. I used to be checking continuously this blog and
I am inspired! Extremely useful information specially the remaining part :
) I maintain such info much. I was looking for this particular information for a very lengthy
time. Thanks and best of luck.