
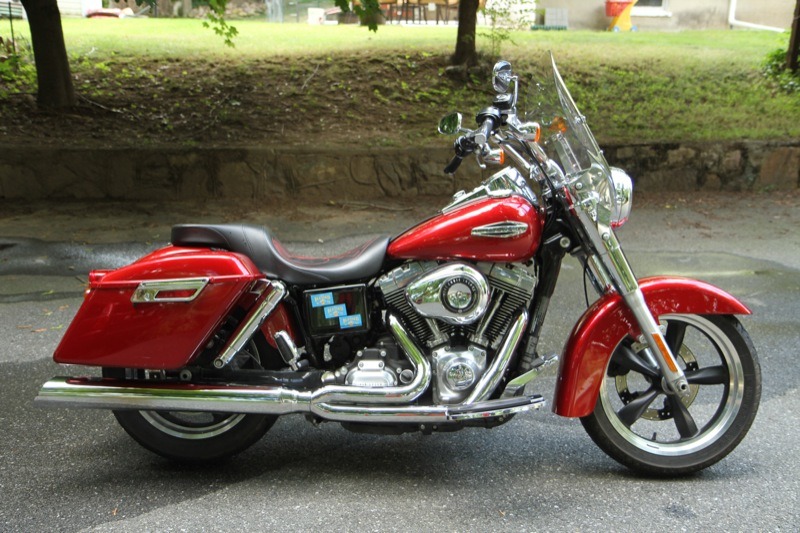
Around this time last year, the Zipper’s Performance tech team at their headquarters in Elkridge, Maryland, installed the ThunderMax with AutoTune EFI controller and a Zipper’s HiFlow Air Filter Kit in my 2012 Switchback. The horsepower and torque boost was considerable, and I was very happy with the bike’s snappy performance. Installing a set of Zipper’s Red Shift Cams seemed like the next logical step, so I rode the Switchback to Sussex Hills Ltd. to discuss the project with owner Norman Gross and lead tech Matt Liptak.
Zipper’s offers two camshaft variations in the Red Shift HiTorque cam series for 96″, 103″ and 110″ engines. Red Shift 525 cams are designed for 96″ and 103″ Touring bikes and promise to deliver immediate throttle response and acceleration at or below 2000 rpms without detonating. Red Shift 527 cams are designed for 103″ and 110″ engines and not only deliver immediate throttle response in 6th gear, but also provide fast acceleration at low rpms. Both cams increase torque and horsepower across the board, and add significant midrange power from 2200 to 6000 rpms.

Selecting the cams actually proved relatively simple; the ThunderMax displays the rpm range in which you tend to ride. Historically I’ve spent most of my time in the 2600–2800 rpm range, so the 527 cams seemed the obvious choice. It was recommended that I go with the Red Shift 527 Zip Kit, which included the cams, a cam/rocker gasket set and a Torrington cam bearing set.
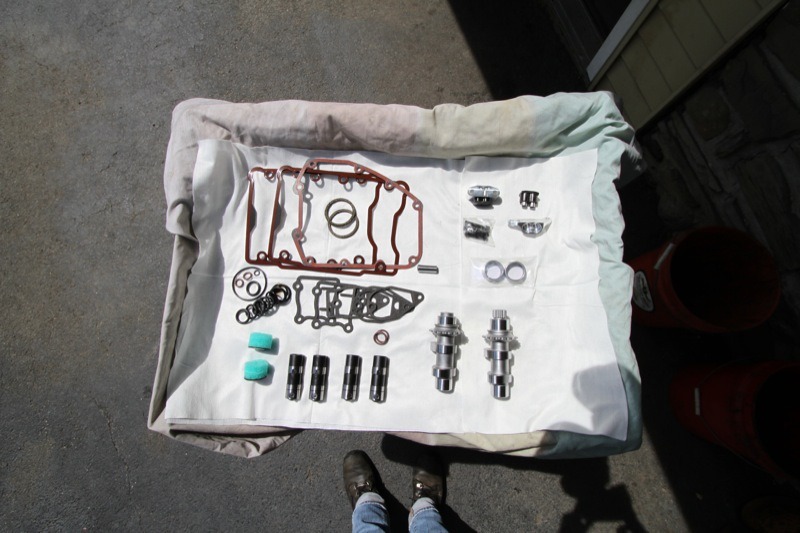
We also planned to replace the stock lifters with a set of Hy-Lift Johnson “Direct-Shot” Performance Lifters designed for high-performance cams. Overheating due to lack of lubrication is one of the most common causes of lifter failure. These lifters feature a unique oiling system, via another oiling passage, that squirts oil directly onto the axle, roller needle bearings and cam lobe surface.
When looking for an exhaust system that would complement the enhanced performance characteristics of my bike, I remembered that D&D was the first aftermarket exhaust company to manufacture a system for the Switchback—the 2-into-1 Fat Cat. D&D’s dyno testing showed higher torque and horsepower gains by up to 10 percent as tested with the Zipper’s Hi-Flow Air Cleaner, which had previously been installed on my bike.
I chose the chrome Fat Cats (they are also offered in black), which come with heat shields already installed, bolt kit, brackets, exhaust gaskets and baffles. There are four baffle options—louvered and louvered wrapped, and Big Boar and Big Boar wrapped. I selected the louvered option because it’s recommended for 103″ engines, and I requested that they be wrapped to keep the noise down without compromising performance. They come in slash cut or back cut, and I could’ve ordered an optional exhaust tip but I decided to keep it simple.
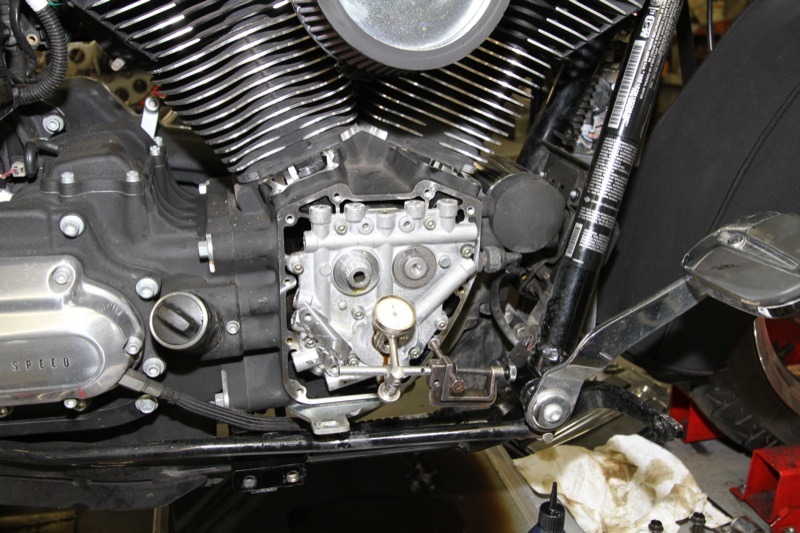
Preparation and installation of all components was done by Matt, and he started by getting a baseline dyno run. Once we had the numbers we needed, the bike went up on the lift and Matt cut the power, cut off the gas flow under the tank, moved the dash out of the way, removed the tank and took off the right saddlebag and floorboard to get at the exhaust.
Matt disconnected the O2 sensors at both ends and removed the entire exhaust system. Then he removed the cam cover, rocker boxes, air cleaner cover and then the rockers to get at the pushrods. While he was in there, he inspected the exhaust valves to make sure they weren’t leaking.
Next to go were the pushrods and retainers to get at the lifters for removal. Then off came the primary cam chain tensioner, and already there were some gouges in the shoe. The cam chain and sprocket were removed, with Matt taking note that the spacer might have to be changed to make sure the sprockets would line up within H-D’s specs of 0.010″.
Matt measured the crankshaft runout, which was 0.0035″ to 0.004″—too much play for gear-drive cams, hence, the selection of chain-drive cams. He removed the cam plate, oil pump and oil pump housing, then the cams and clips from the cam plate as well as the stock cam bearings. Cam plates for late-model bikes don’t have an inspection plate or “cleanout” port, so he cleaned it up the best he could, making sure no debris remained.
He polished the end of the crankshaft, partially to inspect it, and made sure there was no debris. Then he cleaned the entire case before installing the new Torrington cam bearings. Next was the cleaning and inspection of the oil pump housing and the removal of the old O-rings. Matt popped in the new O-rings provided with the cams.
A generous application of assembly lube onto all critical parts—oil pump housing, oil pump and gerotors—was next. Technically the oil pump could’ve remained there, but with 19,000 miles on the bike, Matt took the opportunity to remove, clean, inspect, lubricate and reinstall it.
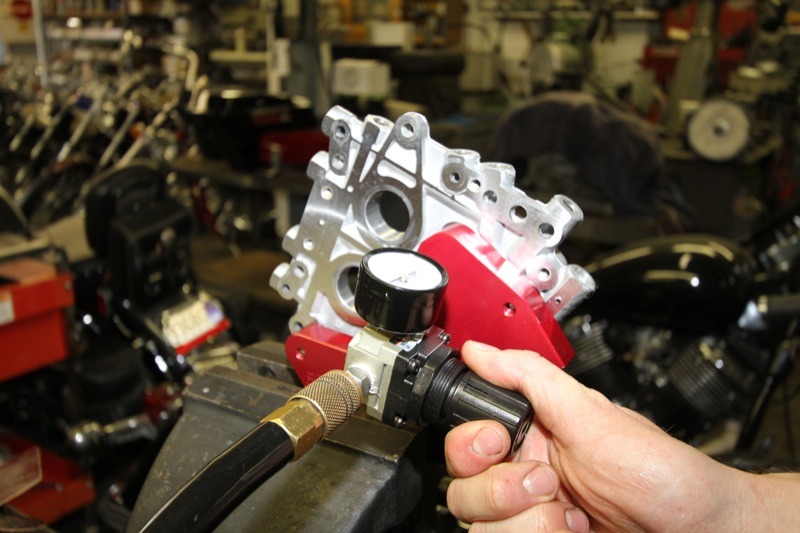
He then used the Feuling Pressure Relief Test Tool to test my cam plate for any possible internal leaks. Fortunately, my plate sealed within Zipper’s specs of 40–45 psi on a good plate. Zipper’s recommends installing a new Baisley Precision-Ground Bypass Plunger whenever using the original cam plate because stock plungers are not known to seal properly and may leak in the closed position. This leak can alter the flow of oil to specific areas of the engine, and starve the engine of oil in vital passages. The Baisley valve has a concentric taper that seals better on the cam plate and promotes proper oil flow to the lifters, rockers, timing chest, cam chain tensioners, piston cooling jets and the top end of the motor. After installation of the Baisley valve, Matt re-tested the oil pressure and it measured at 42 psi.
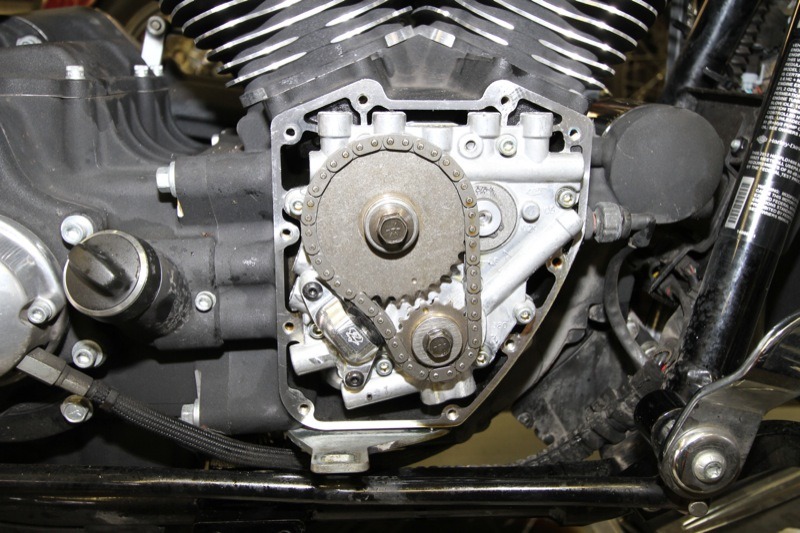
More assembly lube went onto the cam plate and cams. The cams were matched up in the secondary chain and inserted into the cam plate. Matt reused the metal washers for the front cam but used new snap rings (not included in the Zipper’s kit). He measured cam lineup again, cleaned and lubed the new secondary cam chain tensioner and installed it onto the cam plate, using the torque setting specified in the installation instructions.
He cleaned the threads of the cam support plate bolts and oil pump mounting bolts with a wire wheel to make sure to get the proper torque when tightening. Then he used tappet block alignment tools to align the oil pump with the cam plate (see the H-D service manual for specifics).
Matt bolted up the cam gears without the chain to make sure the gears lined up with the OEM rear spacer. They were within 0.010″ so he left original spacer in and installed the cam gears, sprockets and chain. He bolted in the new dual-piston cam chain tensioner and buttoned everything up in the cam compartment (except for the lifters) as directed by the Harley service manual. Then he rolled the rear wheel to make sure everything flowed smoothly.
Matt applied assembly lube onto the lifters and dropped them in. He installed a new Breather Assembly Kit (Part #17025-03A has been superseded by #26500002). For only a few bucks, it’s cheap insurance and easier to install than taking apart the old breather assembly.
Moving on to the exhaust, he removed the stock exhaust hanger and installed the D&D exhaust brackets that are made of steel; they’re heavier and more solid than stock. He used a combination of stock bolts and new bolts and washers provided by D&D. (Note that the D&D pipes are manufactured with 12mm bungholes for the stock Harley O2 sensors, but D&D will drill the bungholes to 18mm to accommodate the ThunderMax with AutoTune if you request this when you order the pipes, as I did.) Matt screwed in the O2 sensors to make sure they threaded properly. The flanges were already installed on the header pipes, and he installed the pipes after making sure they lined up with the exhaust ports.
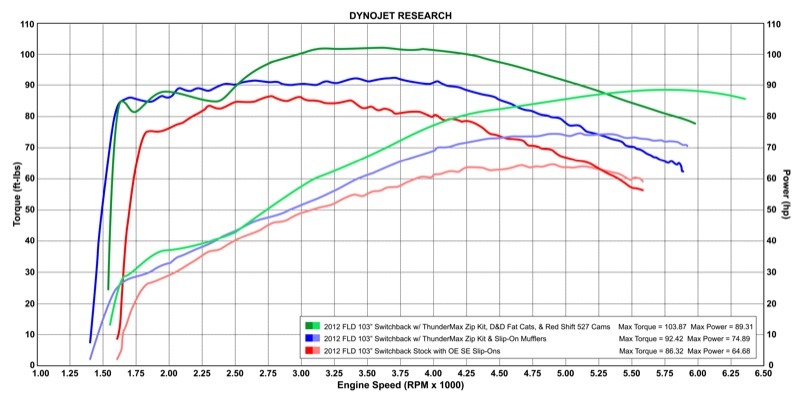
Next was the upload of a new ThunderMax map to match my new cam/exhaust configuration as closely as possible (the ThunderMax self-adjusts so I expected it to be fully dialed in within a week or two). When Matt did the final dyno run and compared the results with my prior dyno runs, I was quite pleased to see significant increases in both torque and horsepower. The baseline run on my stock FLD was 64.98 hp and 86.89 max torque before any performance products were installed. After the installation of the ThunderMax with AutoTune EFI controller and Zipper’s HiFlow Air Filter Kit, the dyno showed 73.64 hp and 90.12 max torque. And once the Red Shift cams and D&D exhaust were installed, the numbers showed 89.31 hp and 103.87 max torque.
I noticed the difference on my hour-long ride home, too. At one point, the guy in front of me was driving very slowly and finally pulled over to let me pass. I downshifted and when I released the clutch lever as I gave it gas, the bike shot forward so quickly it nearly threw my left hand off the grip. And my overall riding experience improved—the bike’s “sweet spot” is now between 3,000 and 3,200 rpm, where previously, the bike was happy only at 2,800 and below. Another advantage is that I gained back almost all of the gas mileage that I’d lost with the ThunderMax install, meaning that the bike can now go 150 miles or more (depending on factors such as temperature and wind force) before I have to stop to refuel.
The combination of the Red Shift cams, Fat Cat exhaust and all the other recommended components turned out to be a winning combination. The only problem is that I’ve been spoiled and will never want to ride another stock bike again.
Zipper’s Performance Red Shift Cams and D&D Fat Cat Exhaust:
#517-307 Red Shift 527 Zip Kit – $419.95
(Includes #413-907S Red Shift 527 Cams (Chain Drive), #456-244 TC88 Cam/Rocker Gasket Set for Twin Cam engines, #417-460 ’06 FXD/’07-up BT Torrington Cam Bearing Set for Twin Cam engines)
#413-901 Dual Piston Cam Chain Tensioners – $159.95
#472-500 Hy-Lift Johnson “Direct-Shot” Performance Lifters – $144.95
#626-010 Baisley Precision-Ground Bypass Plunger – $29.95
#583-32LQ D&D Fat Cat 2-1 Exhaust, Slant Cut Louvered Wrapped Baffle – $725 (black is $831)
zippersperformance.com
danddexhaust.com


Great article,been looking for info on the cam for a while. Hope you can get this back on a dynobefore the summer.