
Done before dinner
Two wheels turns to three
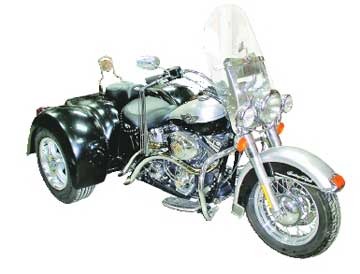
As most of ya know, I had ta turn Reggie’s beloved 100th anniversary Heritage into a trike so she’d be able ta ride again after a botched surgery on her spinal cord. For a lot of people, their ridin’ days would’ve been over then an’ there, but not my Reggie! She should be an inspiration ta everybody with a handicap that wants ta keep ridin’. Where there’s a will, there’s a way, by God!
Bein’ the persnickety li’l critter she is, though, not just any kinda setup would do, so decidin’ was tough. There are a lotta nice kits, components, an’ ready-made trikes out there, more than I’d ever have imagined before I started diggin’ into ’em, but we finally settled on the kit made by Champion because it looks great, an’ my ol’ amigo, Red Baker, owns one. Reggie sat on his, an’ assured me that she could ride it without too much trouble. At just under eight grand fer the bare bones kit, it’s a bit pricy, but it’ll be worth every penny ta see her back in the wind! They also offer extras like a reverse gear kit, an’ a hitch.
When I got ready ta order the kit, I went ta see ol’ Foster, at Foster’s Bike Shop in Fresno. He always treats me good, he buys donuts every Friday, an’ he’s also the local Champion dealer. He said that when he built Red’s, he finished it in a day an’ a half, an’ could’ve cut a half day off that if he’d read the instructions first. I told him that real men don’t eat quiche or read instructions, so I’d prob’ly have to backtrack too.
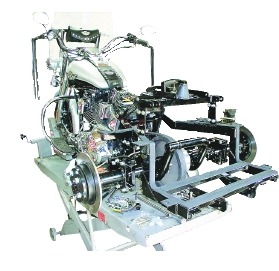
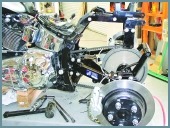
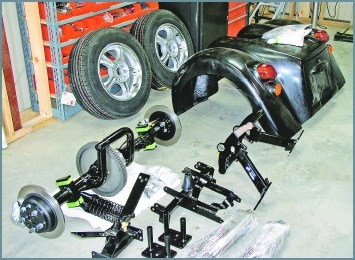
The wait was almost a month from order ta delivery, an’ I got the kit home the day before Thanksgivin’. That evenin’ I got Reggie’s Heritage up on the air table in the shop, an’ proceeded ta tear the ass end off of it. That’s as far as I got, but I did spread the trike kit out on the floor an’ surveyed the contents carefully. The quality looked top-notch, with all the components powder coated, a sweet billet limited slip differential, “mag” wheels with tires, an’ even a set of Bassani mufflers.
One thing that kinda griped my ass at first was that they don’t include any instructions with the kit except the ones fer installin’ the damn hubcaps. Ya have ta download ’em off their website, an’ they’re a bitch ta find after a few drinks. Yeah, I know all about real men an’ instructions, but ya gotta sop up the spilled coffee with somethin’, don’t ya? Considerin’ what the kit costs, they should be leather-bound, gold-trimmed, an’ soak up coffee like a sponge! Kenny, from Champion, got back ta me by e-mail a couple of days later, an’ explained that their dealers already have the instructions, an’ since most installations are done by dealers, they don’t put the idiot sheet in with the kit. OK, guys; all’s forgiven.
On Thanksgivin’ morning, all six grandkids were runnin’ around the place like wild… uh… Native Americans, so I did a magic trick for ’em: I disappeared! I snuck off ta the shop before the first skinned knee or dog bite got me sidetracked for the rest of the day. I laid all 20-somethin’ pages of instructions out on the bench, an’ I was surprised that they were so easy ta follow. Most idiot sheets are drawn like a third grade art project, but these were well drawn, an’ well explained. I went through the parts list an’ laid everything out right down ta the nuts an’ bolts ta make sure everything was there.
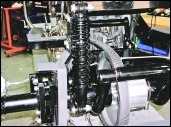
First thing on the list was ta press new pivot bearings inta the swingarm. (Use the old ones if ya want, but I’d get new ones if I were you.) Ya use all the stock spacers, shocks, an’ pivot bolt, an’ the new swingarm goes on as slick as a factory part. I did have ta grind a corner of the LegendAir shock ta clear the bracin’ on the swingarm, but stock shocks would fit with no modification at all.
Next up was the inner swingarm support, that bolts in an’ holds the “T” for the brake lines, as well as stiffenin’ the swingarm. The original brake line is used ta feed the dual rear calipers, so now would be a good time ta check its condition. It attaches to a brass T fitting that comes already mounted on the swingarm, an’ the braided steel lines that come with the kit go out ta the calipers. They even tell ya ta bungee strap the brake pedal down ta keep from drainin’ the reservoir.
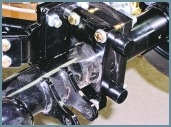
The differential itself mounts on big 1″ steel studs in plates that bolt ta the swingarm. It comes apart in the middle with two big Allen bolts ta install the drive belt. I hung the right side first, slipped the belt on, then hung the left side. They send ya all “grade 8” hardware, so don’t be afraid ta torque ’em ta specs when the time comes.
When I got everything ready ta align, the belt was centered in the pulley, the axle was straight, an’ the belt tension was set, so I torqued it all down. Easy as my first girlfriend, an’ better lookin’!
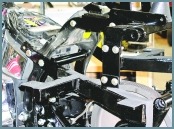
The top framework that holds the shocks an’ the seat also helps ta support the lower framework ta mount the body, an’ uses the old fender strut bolt holes. When ya install the body mount frame, the top an’ bottom frames tie together with steel plates on both sides.
Once the top frame is in place, the coil-over shocks go on, ta work in conjunction with the stock shocks, an’ they’re adjustable fer a softer or stiffer ride.
The fiberglass body is sleek, an’ good lookin’, comes in black jellcoat right outa the mold, or for a few bucks more, they’ll sand an’ prime it for ya. It’s held in place with 3/8″ bolts, an’ it comes prewired with all the lights an’ signals, so ya just plug it into yer existin’ harness. It even has a little lockin’ trunk that’ll hold yer gear, beer, or leathers.
It’s unusual for me not ta find somethin’ ta bitch about, but with this kit, I just can’t. Everything was well made, fit like it’s supposed to, and looked great. By 2:00 p.m. on Thanksgivin’ day, I was ridin’ it down the street. The kit calls fer Sampson “true dual” headers, but I had ta move the shifter ta the right side, so the front pipe that runs under the cam cover wouldn’t work. I stuck a set of Jesse James “Hell Bent” pipes on just ta try it out, an’ Reggie likes ’em, so I guess they’ll be stickin’ around a while.
If yer lookin’ ta convert to a trike, I highly recommend the Champion kit. The instructions’re clear, the assembly’s easily done by anyone qualified ta tune up a lawnmower, an’ everything fits like it should.
If you’ve never ridden a trike, it’s a whole different ball game, lemme tell ya. They want ta fight ya a bit, especially on low-speed turns, an’ rough road, an’ the Champion kit’s no exception. The differential makes it easier ta turn than a “live axle,” but it still takes a lotta upper body strength ta ride one. I may have ta stick a set of five degree raked trees on Reggie’s ta make it easier ta turn, but regardless of the sacrifice in handling when compared to two wheels, the main thing is that she’s ridin’ again, an’ that makes it worth all the cost an’ effort!
Champion Motorcycle Accessories International Inc.
800.875.0949 or 714.847.0949
Or just call ol’ Foster; he’ll even buy the donuts!
Foster’s Bike Shop
2217 N. Pleasant
Fresno, CA 93705
559.486.5656


I bought one of the Champion Trike kits for my 2007 Yamaha Roadstar Installed it with no trouble . But it has a bad shake in the steering.
I have a new Avon trike tire on it checked the tightness of the front end lowerered the tire presser in the rear to 20 lbs . I’ve’ tried to get in touch with Champion and they told me the shake was the nature of the beast The bike has only 10 thousand miles on it. only reason I changed it to a trike is I’m 74 but the shake scares the hell out me at times. I looked for a
damper but cant find one for a Roadstar/ sure would apprecate some help.
Howdy, Kenneth!
The shake kind of is the nature of the beast, but there are things you can do to make it less noticeable. Reggie’s trike still shakes a bit when she first takes off, but not at higher speeds. An EZ Steer kit helps immensely, also making turning far easier than with stock triple trees. These kits increase the “rake” of the forks, making it more stable. Most steering stabilizers you find online can be easily modified to work with your forks and frame by slightly re-designing the brackets to fit. With the shake reduced by these modifications, it’s something you’ll get used to with time, as long as it doesn’t occur at higher speeds. If it shakes at highway speeds, there’s something off in the geometry that needs to be checked by a qualified shop. Here’s the link for the EZ steer kits:
Ride safe,
B-
http://www.championsidecars.com/ez-steer.html
I also had a wobble at low speeds,20 mph and slower.I have EZ steer.All i did was to torque the head bearings tighter and fixed it.The instructions called for 30 lb ft,I went to 50 lb ft and can ride down the road no hands-no wobble.I run 36psi in front and 22psi in rear.
How do I tighten a drive belt on my 95 heritage Softail with the champion trike kit?