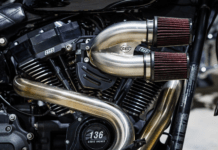
2-into-1 Nostalgia Header
HackerPipes
$599
Chrome w/chrome heat shields: $80
Rotatable slash cut tip: N/C
www.hackerpipes.com
813.338.6590
So, who wouldn’t want to try a new set of pipes? When the opportunity came to do a review on HackerPipes’ 2-into-1 Nostalgia Header for my ’95 Heritage, I was ready to wrench. But first, there were options to consider. Just about every aspect of HackerPipes’ systems can be customized to suit your individual style, so it takes a little time.
First, you need to choose between a chrome and ceramic finish. Being a traditional values kind of guy, I picked chrome pipes with chrome heat shields. If I’d wanted a ceramic coating, I could have picked from available colors.
Then there is the core selection. Three distinct muffler cores are available: Quiet, Horse Power and Track Tuned. Since this is a review, we decided to compare the Quiet Core ($10 upgrade) with the Track Tuned (loud) Core. They are fairly easy to swap if they haven’t been on for very long.
The next decision is the tip: Tapered, Slash, Whaletail or Billet? I picked the Rotatable Slash Cut tip.
After the pipes were ordered, I hooked up with Jeff McKinney of Moravia Motorcycles Inc. on Route 18 in Wampum, Pennsylvania, (www.moraviamotorcycles.com) to schedule some dyno time. We needed to establish a baseline performance for my existing setup: a ’95 Heritage Softail 80-inch Evo with an SE-3 cam, Yost Power Tube, K&N filter and H-D dual exhaust. With the air box on, we netted 65.3 hp and 79.92 ft/lbs of torque. With the box and filter off, that increased to 67.6 hp and 82.43 ft/lbs of torque. Now all I had to do was wait for the UPS truck.
While I was waiting, I soaked the existing exhaust system fasteners with PB Blaster so I had half a chance to remove the system intact. Ryan Campillo of HackerPipes gave me the UPS tracking number for my pipes so once I knew they were coming, I began removing the old system.
I started at the header pipes, figuring if they came off clean I could deal with any other stuck or broken bolts in fairly short order. To my surprise, all four collar nuts backed off without a struggle. Because of the duals, I needed to remove three of my four floorboards to complete the disassembly. The crossover tube clamp loosened without any issues as did all other clamps and brackets except for the left side rear muffler hanger bolt. It snapped.
The UPS truck pulled up with the new Hacker Pipes system almost on cue. I opened the box to find everything well packed and wrapped. I sorted through the parts and laid everything out in front of the bike to be sure there were no surprises. The optional heat shields were already installed and the optional Quiet Core was labeled as such.
A quirk of the aftermarket exhaust industry is that you don’t get new split retaining rings when you buy pipes. This is the third set of pipes I’ve had on this bike and I’m still using the original retainer rings. If you have split ring pliers, use them to remove the rings from the old pipes. If not, use a screwdriver or needle-nosed pliers. Just don’t stick ’em through your hand or put your eye out. After sliding the retainer collars onto the new pipes first, put the retainer rings on—no tools required. It’s a good idea to replace the crush washers at the exhaust ports now, too. They’re cheap and the replacement will give you a good seal. You’ll need to get these at the dealer. They’re not included with any pipes I’ve ever owned.
Now I was ready to bolt up the new system. Following the instructions, I fit the new header in place. I slipped the front pipe in first and very loosely bolted it to the engine. Next I maneuvered the rear pipe to its port. There is some flex in the system and I needed to tweak it a bit to get the rear nuts in place, but I didn’t need any tools. At this point, I stepped back and admired the new header gleaming in the sunlight, but resisted the temptation to fire it up fully opened.
Next, I bolted the new kit-supplied muffler support piece into place with two supplied Allen head bolts and washers. After that, I put the supplied muffler clamp on the muffler and fit it to the head pipe. Then I bolted the muffler to the support with two supplied bolts/washers/jamb nuts and tightened the muffler clamp. The last detail was to slide the tip into place and install one bolt/washer combo to secure it.
By now, your old exhaust will be laying on the ground along with a few wrenches. Be sure your floorboards don’t get lost in that pile before, in your enthusiasm, you fire up the bike and plan to take a test ride. With all the old pieces lying around it occurred to me that an unexpected bonus is that the new HackerPipes system weighs in about 12 pounds less than my previous system.
Most of my wrench time on the project involved removing and installing the three floorboards. If you have passenger pegs instead of boards, it will cut the time considerably. Including time for snapping photos, I spent about an hour taking off the old pipes and almost the same to install the new set and to put the boards back on.
I hit the button and the bike rumbled to life with a much edgier sound than it had before. On my first ride, I passed a state trooper. We don’t have a lot of trouble with noise abatement in Pennsylvania, but I didn’t push my luck by clearing my new pipes. On the ride back to Moravia Motorcycles, the bike didn’t feel as torquey off idle as it had with the old setup, but from about 3,000 rpm, it came on and sounded great.
The dyno revealed a bit of a dip in power between 2,500 and 3,000 rpms even with tuning. We ended up with new numbers of 69 hp with the air box on—an increase of almost 4 hp over the previous setup—and peak torque of 86.58, almost an 11 percent increase. Unfortunately we didn’t have time to test and tune the Quiet Core for a dyno run, but I did put it in and could feel the flat spot at 2,500 rpm go away. I’m currently running a 175 main jet and the Quiet Core.
In the interest of fairness and ethics, I should mention that the dyno runs revealed an ignition problem at high rpms that we were not able to resolve. I still have OEM dual-fire ignition and will likely upgrade that in the future. This wasn’t a problem we could hear or feel, but the dyno did. It’s not related to the HackerPipes at all.
On the road, there is plenty of clearance with the HackerPipes system and certainly more clearance than the duals I was running. I enthusiastically entered some uphill, decreasing radius turns and was unable to drag the pipe. The Quiet Core is still louder than my old pipes and loud enough to get attention if you need to, but they’re not obnoxious.
HackerPipes, including all welds and brackets, come with a lifetime warranty, excluding discoloring or weathering. The Nostalgia 2- into-1 headers are made of 18-gauge steel. It’s hard to beat a set of pipes that look good, sound great and increase overall performance.


