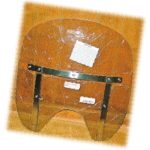
HAR-WGDG0 Stock Detachable 15.5″ L—$148
Light Grey Tint—$20
Custom Sizing—$30
Clearview Shields
http://www.clearviewshields.com/
800.798.6089 or 303.838.0886
Goldilocks wouldn’t have anything on me in my quest for the perfect windshield for my Harley… This one is too tall. This one is too short. Then finally, I found out that if you call Clearview Shields, they will make a motorcycle windshield that is just right for you!
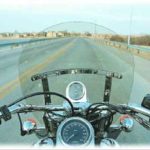
I had a slight mishap with my Dyna Wide Glide and broke the top corner out of my detachable, compact, low-profile, smoked windshield. I could have gone back to Harley and gotten a replacement, but I have been spoiled by the Clearview Shield on my Road Glide that incorporates an upper recurve to push the air higher and create a larger, quieter pocket of calm air.
For just a few dollars more, I got a replacement windshield from Clearview for my Wide Glide that is actually thicker (3/16″ thick versus the 1/8″ thick windshield from Harley), and incorporates the upper recurve. Clearview even custom-sized the windshield to the same 15.5″ height of the low-profile windshield that I originally had. I was pleasantly surprised to find out that they offer “tailored sizes to fit your height,” since I managed to overlook that tidbit of information while perusing their website. I went back and checked their home page, and sure enough, “For 19 years Clearview Shields has helped motorcycle riders worldwide achieve an enhanced level of performance through the customization of their motorcycle windshield.”
They also claim, “We have very knowledgeable people ready to help you find exactly what you need.” I found John Lauk, at Clearview, to be very helpful. He suggests that the proper height of a windshield, if you want to look over it, is about nose high.
Upon receiving the box from Clearview, you find that they package their windshields with about 6″ of foam surrounding them. They also cover the shield with a protective clear 2ml film. I did actually read the sticker that stated, “Removal of the film masking will void the terms of an exchange.” Being the paranoid perfectionist that I am, I tore off the protective covering along the areas where the metal windshield bracket would go. (An upside down U shape.)
Now, to get the metal mounting brackets off of the eight-year-old cracked windshield. Since the adhesive on the brackets had petrified, it took a sturdy putty knife to pry the brackets from the windshield. The next chore was removing the petrified adhesive from the brackets. Gary Smith of Blue Springs Harley-Davidson recommended Zep-Off Decal, Paint & Gasket Remover. However, Zep-Off states on its label in bold print: “Poison, Flammable, Vapor Harmful, May Be Fatal, May Cause Blindness, Cannot Be Made Non-Poisonous, Causes Irritation.”
After donning rubber gloves, a bandanna, and safety glasses, I proceeded to remove the petrified adhesive from the windshield brackets. It took only three or four applications of the Zep-Off before the metal brackets were clean enough for the new adhesive strips. Since all of the metal was clean and disassembled, I figured it would be a good time to polish the shiny exterior surfaces. After the hand-polishing job, I applied alcohol (rubbing alcohol, not drinking alcohol) on the interior sides to make sure they would be clean where the new adhesive strips would be applied. With the new adhesive strips on the nicely polished metal strips, I put forth a concerted effort to align the inside horizontal metal bracket and the outside horizontal metal bracket and insert the bolts with the plastic spacers through the holes in the new windshield. Two out of three was the best I could do. It then occurred to me that I also had to have the plastic spacers through the two additional holes that the vertical brackets attach to. Overload. Time to quit for the day.
Day Two
I took an electric drill with a drill bit just slightly smaller than the predrilled holes in the windshield, and proceeded to elongate four of the holes by about 1/16″ toward the outside edges of the windshield. I then applied small squares of Scotch tape to the nine predrilled holes in the windshield to hold the plastic spacers in place. Attaching the windshield mounting brackets, using the original nuts and bolts, through the slightly altered holes, was a breeze after the hole modifications and using the tape. Before tightening the hardware, I put the windshield in place on my Wide Glide and then tightened all of the nuts and bolts.
Continuing with the paranoid perfectionist pattern, I took off each of the nine nuts, one at a time, applied Loctite, and replaced them snugly, one at a time. Whew. Time to put the brand new Clearview custom windshield back in place on the Wide Glide, pull off all of the protective film covering, and put stuff away.
Wait a minute—what’s folded inside the invoice? “Clearview Replacement Windscreen Mounting Instructions.” How thoughtful of them to include mounting instructions. Jeez, what a Homer Simpson moment.
So, what the heck, let’s check out the instructions. Step 1: “Adhesive tape on each plate may increase the difficulty of removal.” Yep, they got that right. “The road test mounting will only involve the Vertical brackets.” Hmmm, 20 degrees and ice. Probably would not have done a road test. Steps 2 and 3 were pretty much the way I did it, but they did not have the problem of the windshield holes and bracket holes not quite aligning. So anyway, luckily the entire operation only involved two tools: a Torx driver and a hex wrench. (I used a socket and ratchet). Now all I had to do was wait out the weather to see how the new windscreen performs. Twenty degree temperature, with salt and sand on the roads, convinced me that a postponement was in order.
A few days later, temperatures reached 40 degrees, so I went for a ride. I chose a square route, about 10 miles to a side. I figured by riding a square, I would experience the wind from each side. The windshield with the recurve at the top may be too efficient, because I seemed to notice more wind from underneath. Solely for your benefit, I had to run it up past the century mark just to make sure the windshield did not induce any high-speed wobble.
I had an opportunity a week later to ride about 140 miles. It was hard to keep the windshield in mind since the riding was so much fun. I was looking over the windshield and not being blasted by air. Obviously the windshield was doing its job. There were no obstructions or distractions to my forward vision, and the wind was not bobbling my head.
Once again Clearview came through for me, providing a significantly better alternative to the standard Harley windshields. If you have any interest in upgrading your Harley (American Other, Asian, or European) windshield, check in with Clearview now because the current production time is 7–8 weeks to ship. Avoid the Goldilocks syndrome and order now. You will have your new Clearview custom-sized windshield by the time the weather warms up.


