
A while back, I dropped my 2012 FLD Switchback. Without going into a lot of detail, let’s just say that the road surface was quite rough and the left bag got the worst of the damage. When I got home I called the local Harley dealer and found that a new bag would cost hundreds, not including the paint, with the total coming to something like a thousand bucks. And I was told that repairing and painting my bag through the dealership would cost approximately the same. In looking for a less expensive alternative, I found ColorRite Touch-Up Paint.

ColorRite has been in business since 1988, manufactures its own paint and has the ability to match any current color offered by Harley-Davidson and Victory Motorcycles. Four basic paint types are offered—touch-up pens for small nicks and scratches, touch-up bottles for slightly larger damaged areas, aerosol cans for large areas, and professional-size cans for those with an HVLP gun and experience. When I called ColorRite to figure out which method would work best, I was asked to e-mail a photo detailing the damage. Based on the photo, which revealed a number of scrapes down to the primer, covering a rather large area, the recommendation was to use the aerosol spray. I learned that it is very difficult to make a good-looking repair with pen or bottle (using a brush) for any damage larger than the size of a quarter if one is the least bit concerned about the appearance. Since I’d never painted a vehicle before and I’m not particularly obsessive about my bike’s finish, I thought I’d start out small with the touch-up pens and see how that worked out. If I wasn’t satisfied with the results, I could always strip everything down and start over, this time using the aerosol spray.

bungee cord

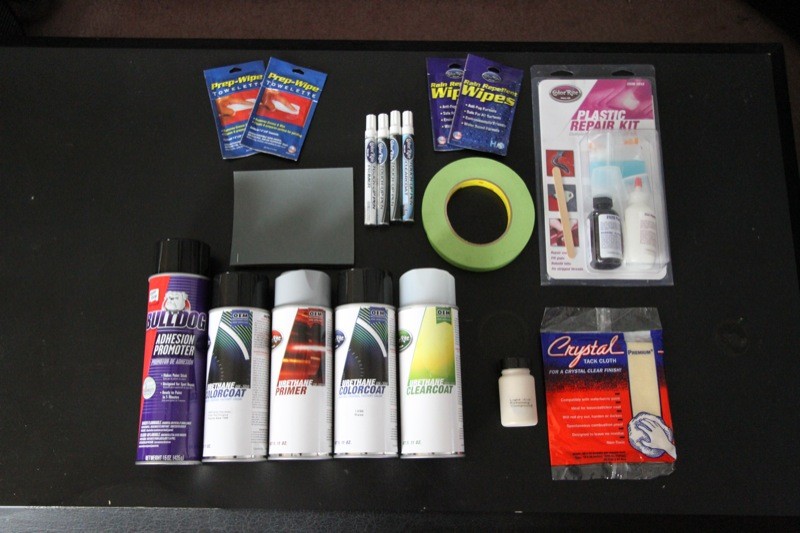
I could have ordered all paint and supplies separately, but ColorRite offers kits that combine nearly all of the items needed for a touch-up job. Part #6496 Harley-Davidson Ember Red Sunglow Touch-Up Pen Complete Repair Package contains three Prep-Wipes, a 3M Wetordry Sandpaper Combo Pack, a Premium Tack Cloth, 3M Performance Masking Tape, Touch-Up Primer Pen Primer, Touch-Up (color) Pen, Touch-Up Clearcoat Pen and a 2 oz. bottle of Light Cut Polishing Compound—all for $49.95. Not included was the #1496 Touch-Up Base Coat Pen ($15.95), a necessity for “Tri-Coat” paints, meaning complex paints that require base plus top plus clearcoat. Not all Harley-Davidson colors are Tri-Coat; in fact, for the 2012 Switchback, Ember Red Sunglo was the only Tri-Coat color. I also ordered the ColorRite Plastic Repair Kit and the Bulldog Adhesion Promoter.
Instructions are provided for each step of the process, and there are even instructional videos on the website, along with a Q&A series and troubleshooting tips. Great emphasis is placed on prep and patience, and if customers run into problems or have questions, the customer support phone line is available from 9:00 a.m. to 8:00 p.m. PST (the support staff is on the West Coast).

Following the instructions, I removed the hard bag from the bike and washed the outer surface with soap and water, rinsing thoroughly and letting it dry completely. Then I cleaned the surface with a Prep-Wipe towelette to remove any grease or other debris, using the Tack Cloth to wipe it down. Again, I rinsed the bag surface and let it dry. Because the scratches were so deep, I sanded the affected area using the provided sandpaper until the area was down to the bare surface. I used another Prep-Wipe to clean the surface, rinsed it and let it dry.

Switchback’s hard bags.
It is strongly suggested that you work with a “test panel” to learn the nature of paint application and drying time as well as color accuracy. Instead, I decided to go for the gusto, right there in my living room. I dabbed the primer pen onto the area needing to be painted, applying only a light coat. The instructions suggested I might need more than one coat, so I waited the recommended 5–10 minutes before applying a second coat.

After a half hour of drying time (20–30 minutes is recommended), I dabbed on the base coat. I let it dry for 15 or 20 minutes and then applied a second coat. After another 20 or so minutes of drying time, I applied the top coat, waiting 20 minutes and then dabbing on the top coat a second time. The instructions called for a six-to-eight hour drying time before applying the clearcoat so I waited until the next morning to continue.

primer, base coat and topcoat pens. Note the “spider web” cracks in the original paint that
were not addressed until the ColorRite aerosol spray method is used.
I wiped down the surface again before applying the clearcoat, and dabbed a light coat onto the dry paint. After allowing it to dry somewhere between 10 and 20 minutes, I applied another coat of clear. I was cautioned not to apply too many coats as the paint underneath might not dry properly and it may cause yellowing. The instructions also dictated that I let the clearcoat dry for three or four hours before handling.

The results were mixed. My stubbornness prevented me from listening to the customer support suggestion to use the aerosol method, and although the paint was a perfect match and the gouges were completely covered, the surface was uneven because I hadn’t taken the time to sand it properly. I was, however, quite pleased with the ease of application and it didn’t take me very long to learn just how much pressure to apply on the various pens and how to avoid paint runs.
It was time to call my friend JoAnn Bortles, owner of Crazy Horse Custom Paint in Waxhaw, North Carolina, for some sanding tips before I began my repainting project. She is an award-winning master painter and author who even competed on the reality TV show Motor City Masters. JoAnn also gave me painting and finishing suggestions, all learned from her hard-won experience over the past several decades.
The weather turned cold again (temperatures over 65 degrees are best for painting and drying) so I called my friends at Black Label Choppers in Dover, New Jersey, to ask if I could use their paint shop. Co-owner Kurt Leifken agreed that I could set up there on Saturday. I figured that since I was going to repaint the left bag, I should also repair and paint over the damage that had been done to my other bag since I’d begun this project. The top of one of the lids had been gouged by improperly packed luggage, and there were more nicks and scratches here and there on both bags. And I’d never tried to repair the “spider-web” paint fractures from the bag being compressed while the fully-loaded bike was laying on its side that time I dropped it.
I stripped the clear and paint off the hard bag and started from scratch. Most of the steps for the aerosol spray were the same as with the pen; just a different application method and different drying times for some of the phases. I used the provided masking tape to cover with newspaper the areas that didn’t need to be painted. Next was the ColorRite Plastic Repair Kit for the gouge in the lid. The kit consists of a powder and a liquid as well as preparation and spreading implements, and I followed the directions for combining and applying the mixture. Then I sprayed a layer of Bulldog Adhesion Promoter on the outer surfaces before I applied the primer.
After spraying the first coat of primer, I waited the required three-to-five minutes and sprayed again. Watching the video had impressed upon me the need for light, even strokes when using aerosol sprays. I waited five minutes and sprayed another coat. Another difference between the pen and the aerosol is the ability to sand down imperfections. A half hour later, I sprayed on the base coat, let it dry for 10 minutes and sprayed a second coat. The instructions directed me to wait 30 to 60 minutes before applying the color coat, which I did. Twice (waiting 10 minutes between coats). Last was the clearcoat, a 15-minute wait and another coat of clear. This time, my work looked a lot better.
Air drying of four to six hours is recommended before handling, so after the appropriate wait time, I removed the tape and newspaper from the masked-off area. I found that I didn’t do a very good job of “blending” the new paint with the old. The colors matched, but if you looked closely you could see a “dividing line” between the original paint and the paint I’d just applied. And there were still some rough spots where I hadn’t prepped the surface properly.
Another call to Black Label resulted in another agreement for me to use their shop the following weekend. This time, I asked Kurt to hang around and steer me in the right direction if he saw me doing something incorrectly. Besides, the guys at the shop hadn’t heard of ColorRite before, so they were interested to see how the brand compared with the paints and other products they used. Now that I was familiar with the properties of each of the materials, the entire process went a lot faster and more smoothly. And Kurt gave me a number of helpful prep and paint tips along the way, which further increased the likelihood of success.
At Kurt’s suggestion, I sanded the clearcoat off the entire surface of both bags and lids so that I didn’t have to worry about blending old paint with new. Rough spots were sanded down further and primer sprayed on again. Then the base and top color coats were sprayed on, with the appropriate wait times in between each coat.
The instructions told me to wait at least five days before applying polishing compound and bike polish; the final steps in the process. When I was completely finished with the job, the bags and lids looked like they’d been painted by a professional. I was thrilled. And proud of my newly-found DIY painting prowess. That said, I now have a whole new appreciation for the talent, craftsmanship and, yes, patience of my artistic friends in the motorcycle and auto industries.
The ColorRite paint and supplies worked exactly as specified, once I slowed down, followed the instructions carefully and did everything correctly (and listened to the advice of more experienced painters). Rather than spending thousands on replacements or repairs, I ended up with like-new saddlebags and lids for less than $200 and a few hours of my time. If any of the parts on my bike ever get damaged and need repainting, I would absolutely use ColorRite products again.


