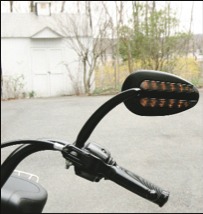
LED Lighted Mirror Set
Harley-Davidson
#92068-08 Satin Black, $299.95
#92059-07 Chrome, $299.95
www.harley-davidson.com
The first components I customize on a motorcycle generally involve riding comfort; touring capability and power, followed by curb appeal when I have a few extra bucks to spend. Only in the past few years have I begun focusing on safety. My Dyna is black and I’ve replaced some chrome parts with black ones, making my bike even harder for other motorists to see, especially at night. I’d already added an LED-lit combination brake light/turn signal license bracket, and now it was time to turn my attention to the front of the bike.
There are more accidents every day involving drivers of four-wheeled vehicles making left turns in front of motorcyclists, and I figure that anything I could do to avoid that scenario is time and money well spent. In 2008, Harley-Davidson added a new color-and-finish option to its chrome LED lighted mirror—black satin—and added the new set to its Dark Custom product line. Since I was in the process of changing out my bars, levers and other components from chrome to black, it seemed like a good time to add these new mirrors.
The LED lighted mirror has front-facing amber LED lights that act as running lights when the bike is turned on, as well as turn signals when you hit the directional switches on your handlebar housing. They also function as hazard lights, just as your original turn signals do, when you hit and hold both directional switches at the same time. These lights, hidden behind smoked lenses, are quite visible to oncoming traffic, and really stand out at night. The design is quite attractive and very clean-looking, as the wiring is concealed in the mirror housing and stems.
Detailed, step-by-step instructions for each Harley model (the mirrors fit ’97-and-later models except for the VRSCF) are written for the layman, and include diagrams with each component clearly marked. If you follow the directions exactly, it’s fairly foolproof, as the wiring connects to the original Harley wiring harness.
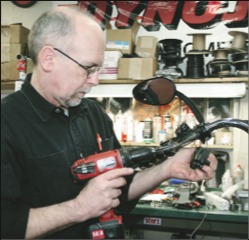
That said, the instructions are intended for wiring as it comes out of the factory—external to the handlebars. If your bike is already internally wired, you will have to adapt the instructions accordingly. So I took my bike to Ken Puzio, owner of Black Hills Custom Parts in Rockaway, New Jersey, to handle the wiring details.
Several warnings are given at the beginning of the install instructions, such as checking to make sure you’re not overloading your bike’s charging system (according to Harley-Davidson, the kit requires up to 500 mA of additional current). You’re instructed to remove your seat and then disconnect your negative battery cable, remove the main fuse and finally remove your gas tank so that you can get at the wiring that runs underneath the tank and along the frame. These mirrors are not intended to replace the stock turn signals and, if you follow the instructions, they will work only if the original (or aftermarket) turn signals are still installed and working.
Ken removed the mirrors that were on my bike, which was easy to do because my front signals had already been relocated to the front forks (yet another reason for my desire for more lighting up front). The instructions detail which hardware to keep for the install (such as the acorn nuts), and what to discard and replace with new hardware (such as washers and locknuts) provided in the kit. Harley even includes a ground ring terminal for each mirror so that the wiring doesn’t get pinched during the install.
The next step was installing the new mirrors, following the directions in the installation guide. Ken was careful not to over-tighten the mirrors; the stems are hollow because of the wires routed through the inside. The instructions then called for installing the Y-harnesses, giving highly detailed instructions that even include charts with wire colors and connector descriptions for each bike model and year. On my Dyna, all wiring from the handlebar controls is routed through a hole in the front of the frame backbone, where the handlebar harness is located. The installer is directed to just pull out the turn signal wiring and follow the rest of the instructions, but since my bike is internally wired, Ken found it much easier to pull the handlebars to get at the wiring. The controls’ wiring along with the wiring from the Heat Demons grip heaters already stuffed inside my handlebars left very little room to maneuver easily.
Because I wanted the mirror wiring to be run internally, alongside my other front-control wiring, Ken drilled holes into the lower switch housing so that the mirror wires could join up with the other wires already inside the handlebars. Then he ran the mirror wires through the handlebars, connected the wires to the Y-harnesses, pulled the harnesses back through the frame, and voila! I now have mirrors with forward-facing surfaces that are lit all the time, and act as additional turn signals when I thumb the directional switches.
The mirror faces are quite large, making my rear viewing area quite expansive. And I’ve been told the forward-facing lights are readily visible to oncoming vehicles from a good distance. They’re easy to adjust without any tools, unlike other mirrors that I’ve had in the past. And the stylish black satin finish fits right in with my black handlebars, gauge and control housings, risers and levers. Nothing like a little light to offset all the Dark Custom darkness.