Arnott 9010-BS Rear Shocks
Arnott Air Suspension Products
$787.00 (as tested)
www.arnottairride.com
877.9000.AIR
Shredder Mike is a country boy who lives down five miles of some of the most unforgiving washboard back road in Texas. To make a living, he remanufactures farm equipment and tractors (hence the name) so he’s familiar with products that you can abuse the hell out of and still rely upon. He is also a rider. The latest bike in his barn is a 2006 Street Glide (FLHX). After a couple of years of beating that scooter near to death, he felt that maybe an upgrade to a better set of rear shocks might be in order, so he searched those currently available on the market and settled on new-comer Arnott Air Suspension Products to replace his less than stellar stock H-D units. Now, no one is suggesting that the environment his bike has en-dured over the last two years is in any way common riding conditions for a touring machine. But then, the Arnott company is anything but standard.
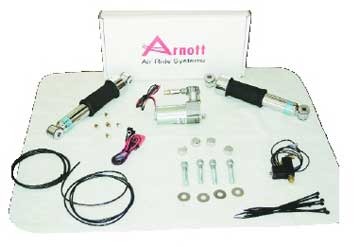
Arnott Incorporated was established in 1989 in south Florida, specializing in the repair of 1984–’87 Lincoln Continentals and Mark VII air ride systems. Their success soon catapulted them into producing air ride suspension systems for everything from performance Mustangs to full-sized trucks, SUVs and Hummers and propelling the company from national to global suppliers. Their most recent endeavor is the Arnott Motorcycle Division, manufacturing aftermarket units for production bikes (includ- ing metric) as well as designing unique systems for custom build-ers. Their catalog lists air ride systems for the complete Harley lineup including Dyna, Softail, Sportster, Touring and VRSC. The 9010-BS shocks we installed are designed for 1980–2007 FLT, FLHR, FLHRC, FLHX, FLTR, FLHT, FLHTC and FLHTUC models. The kit comes complete with an on-board compressor and control switch, a valve block assembly, a set of Bilstein Mono-tube shock absorbers with Goodyear air spring sleeves, hoses, wiring and some excellent instructions.
When Mike first approached me about doing this install, I was a bit apprehensive. He knew my shop, Backyard Bastards, specialized in Shovelheads and ironhead Sporties and basically undertook all projects with a simplistic caveman work ethic (if a one-pound ball peen will do the job, then a two-pounder will ensure the work is completed twice as fast). But then Shredder Mike is also fully aware that my barbecue pit is always hot and the shop fridge is always stocked. So I accepted the challenge, cleared the World War II-era workbench of empty beer cans and Bendix carbs, and dug into this technical marvel. In the end, Mike ended up doing the majority of the work while I mostly took photos and notes, stayed out of the way and made fun of his wrenching skills.
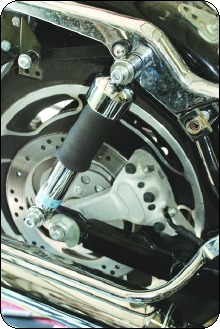
After removing the seat and the battery, we hoisted the Street Glide up in the air and dropped the stock H-D air “assisted” shocks. We had inserted a set of blocks and a scissor jack under the rear tire to keep the swing-arm assembly from falling and to help align the new shocks with their mounts. After pulling the stock units, the Bil-stein shocks were quickly bolted into place, taking every bit of 10 minutes to install, applying blue thread-lock before cinching everything down to 35–40 ft/lbs. The Bilstein name is highly regarded in the industry and associated with everything from Nascar to Baja—and now, Harley-Davidson. And damn if’n they ain’t purty too, an elegant replacement that overshadows the bulky stock items.
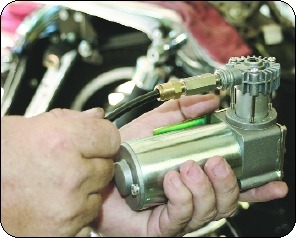
Next, we popped both plastic side covers off and using a thin wall 7/16″ socket, the control module located on the right side was unbolted and left dangling by its wires (along with the bike’s Power Commander unit). This left us complete access to the cavity under the battery box that would be home to the air compressor. That self-contained air compressor is a tiny wonder. Not much longer than from wrist to fingertip, the compressor unit incorporates a triangular bracket that slides into a series of four factory-stamped tabs on the bottom of the battery tray. Using the supplied 10-32 button-head screw to lock the unit into place, the compressor installation was complete. Following the instructions, we installed the quarter-inch tubing into the compressor (Arnott uses Voss air fittings with collets that are very simple plug-and-play components) and routed the line around the battery box to the open compartment directly at the rear of the gas tank. This is the “preferred” location for the valve block assembly. And that’s when it got a little weird and we actually had to do some work.
The valve block assembly is a diverter that takes the single-line air pressure supplied by the compressor and distributes it to each shock. The valve block also has a flow control (complete with an exhaust muffler) so the speed of shock drop can be adjusted to the rider’s personal taste. Since the valve block can be mounted in alternative locations (we tried several) and its orientation is not crucial, no attachment bracket is included in the kit and securing the assembly is left up to the installer. You could actually just tie wrap the damn thing down and it would work fine—but Mike wasn’t having any of that, so a trip to the lo-cal hardware store was in order where we purchased a length of 1/8″ x 1″ anodized aluminum flat bar. We cut off an 8″ piece and drilled two holes to match a couple of threaded holes that were in the valve block. Then, along with the aid of a one-pound ball peen and a vice, we bent the strap into a 45-degree angle (in this case the aforementioned two-pounder would have been severe overkill). Placing the strap-bracket into the “preferred” location, we located a hole in the gusset panel of the frame just behind the rear cylinder’s crossover exhaust pipe (thanks to Harley for providing this hole). We marked the strap through the hole to determine where to drill our mounting point. After a couple of trial fits to make certain of any seat pan clearance issues, we removed our “patented” Backyard Bastards Arnott Mounting System, filed down the edges and installed the valve block.
The final step was installing the control switch. The standard switch is mounted on a bracket that attaches to the horn, under the tank on the left side. But Mike had opted for the much cooler effect of placing it within easy reach by using Arnott’s push-button handlebar switch (item #21-2610). This cutie bolts up to the left-side handlebar control housing, with the wiring routed around the bike’s neck and through the tunnel between the tank and frame’s backbone (a fish tape, patience and a couple of cold ones proved to be most helpful). Afterwards, wiring chores were simple (once we actually took the time to read the instructions) and in short order the unit was spitting out air, with the Street Glide performing push-ups like an Olympic hopeful. The Back-yard Bastards celebrated their install victory in barbecue pit row with Texas-sized slabs of dead cow and a tub of iced cervezas.
The Arnott 9010-BS “Shorty” kit we tested was 12″ long with 3.5″ of travel (a 13″ Bilstein shock is also available). It comes with a 100 percent satisfaction guarantee (refund of purchase price if returned within 30 days) and a full Five-Year Warranty. It retails for $698 with the optional handlebar button control adding an additional $89 to the package. Other options include electronic upgrades and an air gauge monitor. The installation was a straightforward exercise, using minimal tools and a total lack of expertise. And, other than having to fabricate the valve block mounting bracket and some clearance issues with the H-D quick disconnect sissy bar (necessitating cutting a relief on the upper shock spacers), no surprises were encountered. I rode the bike before and afterwards and an improved ride was obvious to me. Initially Shredder Mike seemed to believe the ride a little too stiff until I took him out on nearby “Racer’s Road,” a twisty, 10-mile section of high-speed sweepers. Once he pushed the bike hard through the first corner, it was all smiles and floorboard sparks. A few days later, he called and told me that on the washboard access road to his house he normally rode at a cautious 30 mph, but he was now skirting across at a healthy 50. And then he passed the phone over to his girlfriend who provided this closing comment: “Doesn’t jar my boobs near as much as it used to.” I can’t imagine higher praise.