Creating your own Convertible
One sweet suite of detachables
The clean-sheet redesign of the FL Tourer chassis for 2009 brought a long list of fundamental improvements in both the looks and fun categories to the platform, improvements that, when added to the upgrades brought to the line-up in 2008, touch virtually every aspectof the machines, making them—despite outward appearances—entirely different animals and dramatically superior in most respects to the baggers Milwaukee produced previously. Last year gave us six-gallon fuel tanks, Brembo brakes, and the electronic throttle system that enabled an integrated cruise control and with it a practical anti-lock braking system. The 2009 chassis project continued that hot streak, providing, among other things, a rock-solid ride and flex-free handling, and an exhaust system that largely eliminates the troublesome heat issues at the rear exhaust manifold that have plagued the breed for nearly a decade.
Those welcome developments all fall onto the function side of the ledger, and while the new exhaust setup crosses over onto the cosmetic side as well, with the forward bend of the rear header adding a decidedly custom look to the bikes, it’s the entire rear end section of the models that is the chief beneficiary of the ’09 chassis dabbling. Back there a phat new 180/65B16 tire resides, and with it an impressively sanitary and beautifully contoured rear fender. Adding to the cleaned-up appearance is the elimination of the familiar tubular horseshoe frame member that for a generation looped out behind the saddle, as well as the relocation of the license plate frame and lighting from its protruding position up high just aft of the horseshoe to the lower section of the fender, where it now hugs the sheet metal. Huge style points are awarded for these revisions. But with those style points come some digs in the function department—at least from inveterate bagger jockeys like moi.
See, the combination of that horseshoe loop and that protruding license plate bracket has long served as a de facto packing platform for bungeeing gear behind the seat. Stashing stuff back there—even though it was never intended or rated for that purpose—was a natural impulse. Thus, when we began riding and reviewing 2009 Tourers in earnest, testing the bikes in real-world high-mile and daily-rider scenarios, that makeshift packing platform was immediately and sorely missed. Even securing a parcel or backpack to the passenger seat became more of an iffy proposition, since there was no longer that safety zone behind it to prevent a shifting load from inching back and skiing down the broad smooth expanse of that dashing new fender. What to do?
As it turns out, that downside of the new fender arrangement had already been anticipated by The Motor Company, and the essential elements of a fix devised. That fix consists of a suite of quick-detachable peripherals that build out the back of the bike with visually-integrated snap-on comfort and packing capacity. They were so far out ahead of the problem, in fact, that the basic installation points for the pieces had been engineered into the chassis, though you’d hardly know it to look at the bike in stock trim.
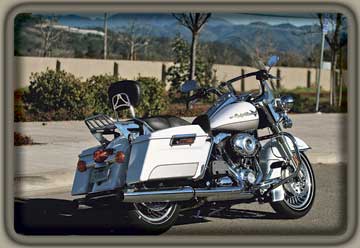
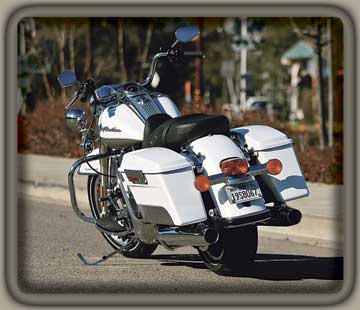
In the case of the 2009 Road King, the availability of these quick-release components, coupled with the bike’s existing quick-release windscreen suggested a whole different way of looking at the model—we saw a Convertible.
A case of old Milwaukee
Harley-Davidson’s Convertible concept—a twofer approach to motorcycle outfitting—was created in 1989 with the FXRS-Conv Low Rider Convertible. The thinking with that model and the ones that followed it was that by putting detachable saddlebags, sissy bar/backrest, and windscreen on what was essentially a Low Rider Sport you could have, if not the best, then at least a good taste of two worlds—street riding and distance touring. It was a great idea but, alas, not a great seller and by 2000 the Convertible nomenclature had been retired. Too bad, too. As a creature of function, it was unsurpassed in the Harley line-up, but as a creature of bling—which is what was selling—it was a doughty stepchild.
As applied to the 2009 Road King, we can dispense with the doughty aspect of the Convertible concept. The only way you could make this dazzling machine doughty is to park it in a barn and set the barn on fire. And we’ll also be changing our Convertible two-world view to that of blingy debonair boulevardier cum distance hauler. That may sound like a tall order on the face of it, but in practice it’s almost ridiculously easy to realize.
And here’s how you do it
Creating your very own FLHR-Conv Road King Convertible (trademark applied for, BTW—by me) requires five pieces of P&A catalog gear. You’ll need the 4-Point Docking Hardware Kit (P/N 54205-09), Standard Detachable Touring Upright (52627-09), Detachable Two-Up Luggage Rack (54215-09), Top Stitch Passenger Backrest Pad (52924-98A), and the Chrome Docking Point Cover Kit (48171-09). The retail price of these items comes to a total of $679.95. The transformation also requires a small tube of 262 Loctite, a T-27 and T-40 Torx bits, a torque driver and about an hour of your time. It’s a leisurely hour, actually, and be forewarned that a good portion of it will be spent pondering how it’s even possible that all this stuff goes on as neatly as promised, and then marveling when it does.
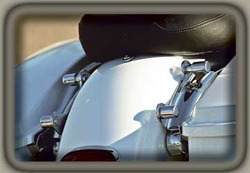
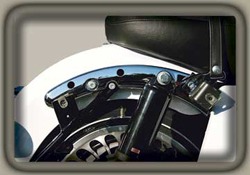
Start by removing the panniers with a twist of the Dzus fasteners, and once the fender strut covers are exposed, remove the center bolt from each. And that’s the sum total of disassembly required. And it’s also when you begin to appreciate how much of this job has already been done for you at the factory. As delivered, the strut covers already have holes punched in them and there are threaded holes in the struts behind to accept the mounting bolts of the Docking Hardware Kit brackets. Before installing them, though, you should do the quick subassembly of the docking points. This involves placing the rubber grommet docks on the short spindles of the brackets. On the long spindles, a spacer goes on before the grommets, and they serve as separate docking points for the luggage rack. T-27 bolts threaded into the ends of the spindles with a drop of Loctite secure it all. Now the brackets can be bolted on, again using Loctite on the three T-40 bolts per side, and torquing them down to 17 ft/lbs.
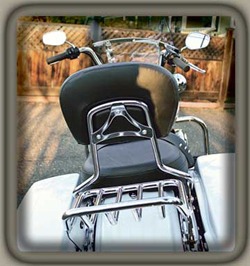
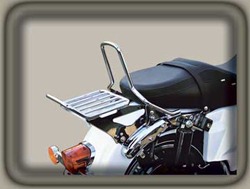
Now you can snap on both the sissy bar and luggage rack. The front docking points for the sissy bar are actually already on the bike in the form of recessed spacers behind the top shock absorber mounts. The front docking points for the luggage rack are the aforementioned spacers on the Docking Hardware brackets, and what that all means is that the so-called 4-point docking setup is really an 8-point setup—and a tight one at that. Attaching the upright/ sissy bar and rack is a simple but exacting procedure and it takes a moment or two of precise positioning to snap them home. The result is a wiggle-free mount, and the parts feel as stable and permanent as if they had been installed at the factory as part of the chassis.
But we still have parts to install to complete the package, and the passenger backrest pad is a real head-scratcher at first. We thought we had the wrong part, if you want to know the truth of it, since it seemed implausible that the plain-backed pad and separate triangular backing plate could actually secure the thing to the sissy bar. Don’t be deceived. It’s the right part, all right, and once you methodically place the spacers into the three bolt holes on the pad, line the thing up on the upright and start screwing it all together a wondrous thing happens. As it turns out, the plain-looking back of the pad actually conceals a mating section beneath the vinyl that draws out with tightening and sucks up to the upright, forming itself around the rails and looking like it had always been there. Whoa.
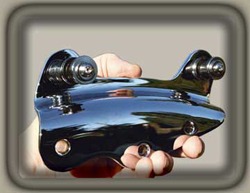
The last piece of the puzzle is the Chrome Docking Point Cover Kit, and this consists of four chrome caps designed to mask the somewhat unsightly rubber grommets on the docking hardware when you’re running in custom cruiser mode. They’re a small wonder in their own right. They’re magnetized. You don’t push them onto the grommets; these things snap themselves on with authority and stick. You could probably install them from a foot away, they’re so magnetic.
And that’s it. Now the Road King can shed its windscreen and wear its chrome docking point covers and look like bar-none the sexiest new FL on the street. Or it can don windscreen, sissy bar/backrest and luggage rack and be ready for serious loading up for the long highway. Or you can pick and choose. The luggage rack and sissy bar attach independently, giving you a number of packing and profiling possibilities. With the price of this complete conversion in the same range as a set of performance pipes, it’s a no-brainer to us where those first accessorizing dollars should go on this model.